Build Flutter LiveStreaming App with ZEGOCLOUD - 2023

I am a developer from Nigeria. A Flutter lover. I am also interested in game development and flutter.
In this tutorial, we will learn how to build a streaming app with Flutter using the Zego cloud UI KITS. If you prefer a video tutorial, click on this link https://youtu.be/tG1kCHBhM5Q
What is ZEGOCLOUD UIKITS
ZEGOCLOUD UIKits are pre-built UI components that helps you build faster and market your apps on time. It is customizable open-source and cross platform. There are many UI KITS available for live call, online karaoke, online tutoring, live-streaming, video etc. Check out the UI KITS here https://www.zegocloud.com/uikits.
Enough about ZEGOCLOUD, Let's start coding.
Step 1: Add the live streaming package to your Flutter app.
This is the link to the package https://pub.dev/packages/zego_uikit_prebuilt_live_streaming. Add this to your pubspec.yaml file with the following command.
flutter pub add zego_uikit_prebuilt_live_streaming
Now import the code into your main.dart file
import 'package:zego_uikit_prebuilt_live_streaming/zego_uikit_prebuilt_live_streaming.dart';
Step 2: Head over to ZEGOCLOUD to create an account. After creating your account, you should see a screen like this(without the projects though)
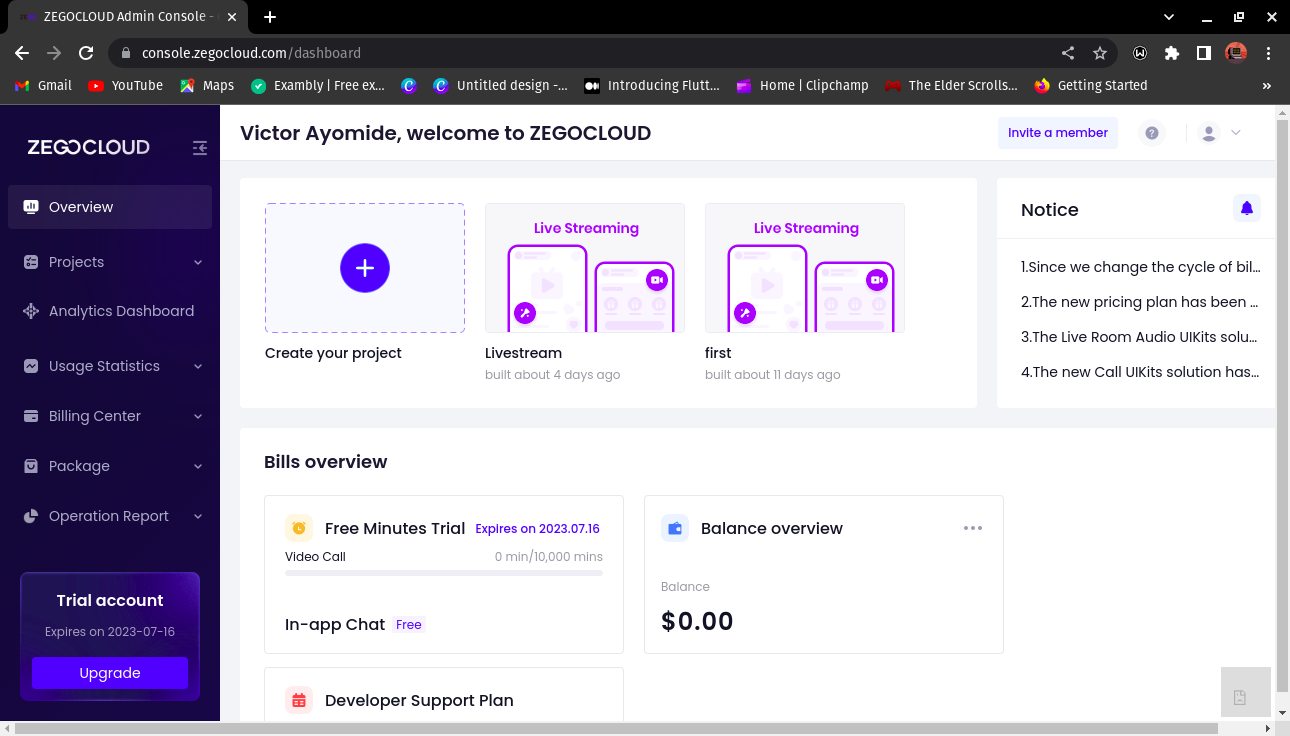
Worry not about pricing, ZEGOCLOUD gives you 10, 000 free minutes to use on any project you create so click on the create project box to start a new project.
Select a use case for your app. In this case, we will select Live streaming
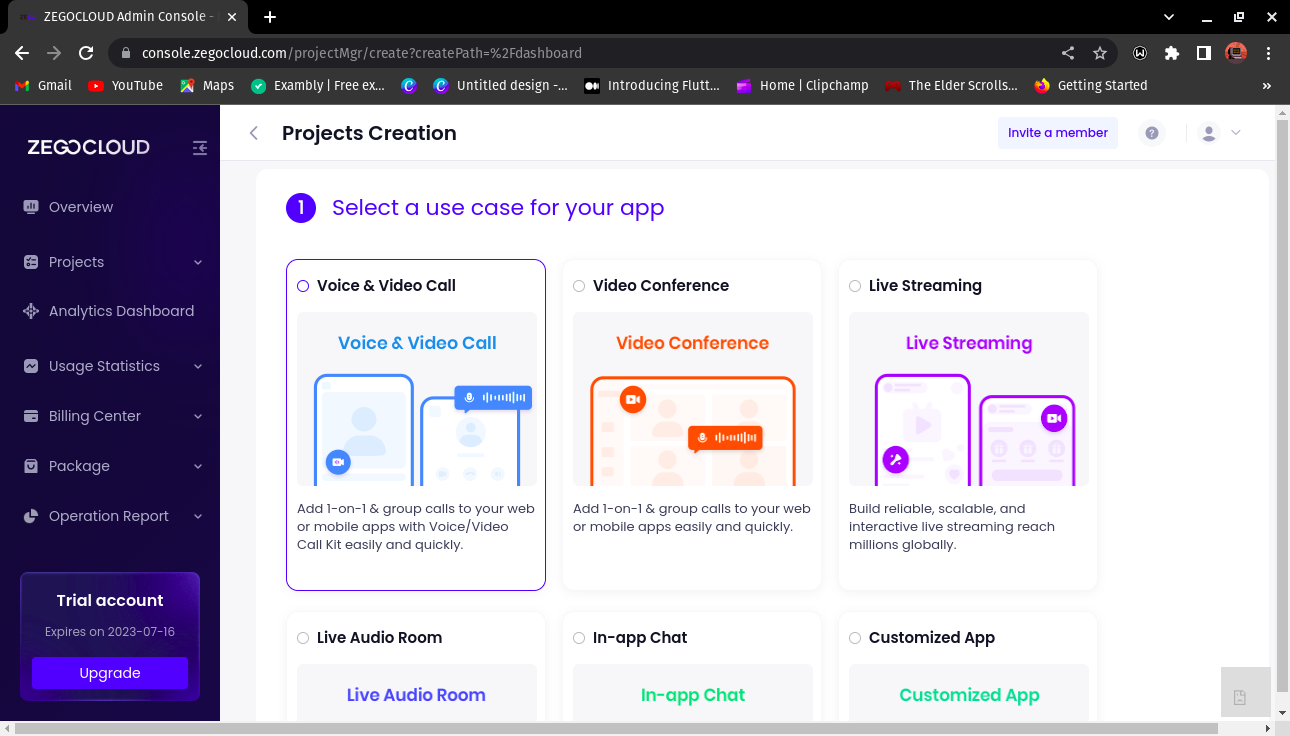
Scroll down and tap on the NEXT button.
Give your project a name. And the Start with UI KITS
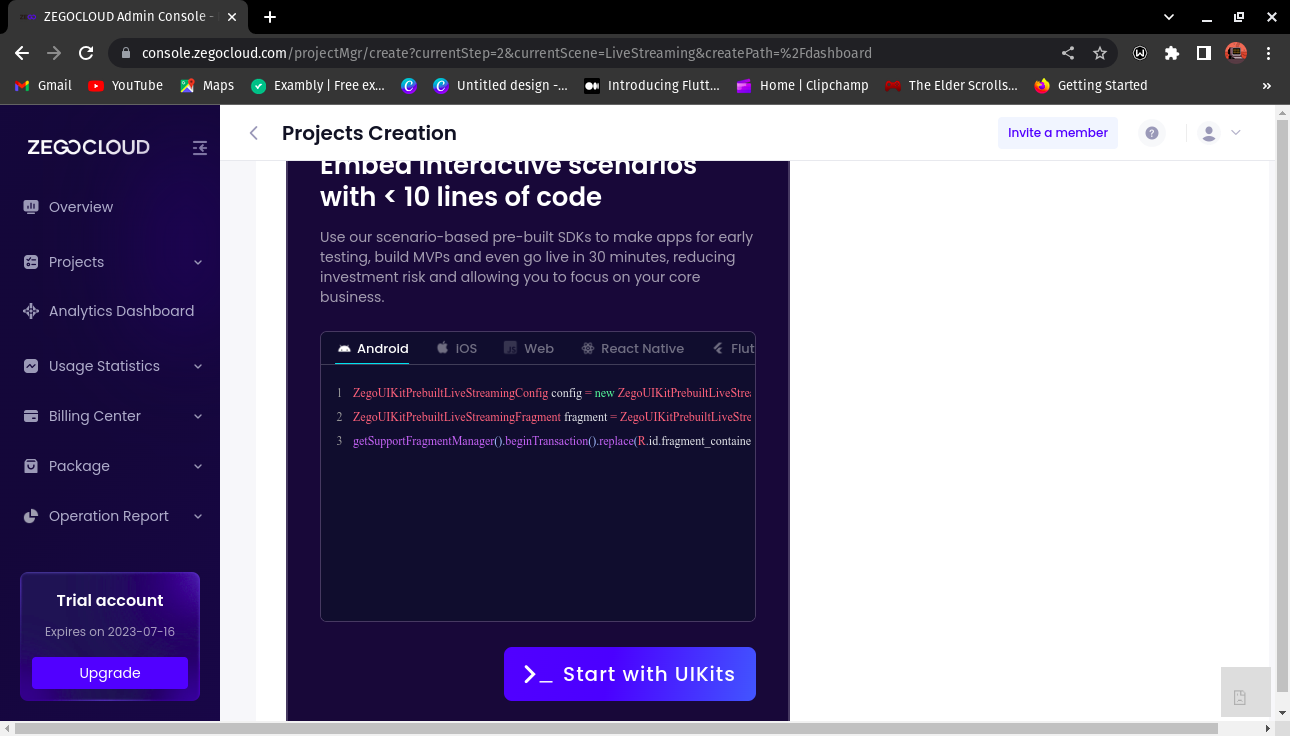
After a few seconds, you'll see that the project has been created. Choose the Flutter configuration and then press the Start to Integrate button.
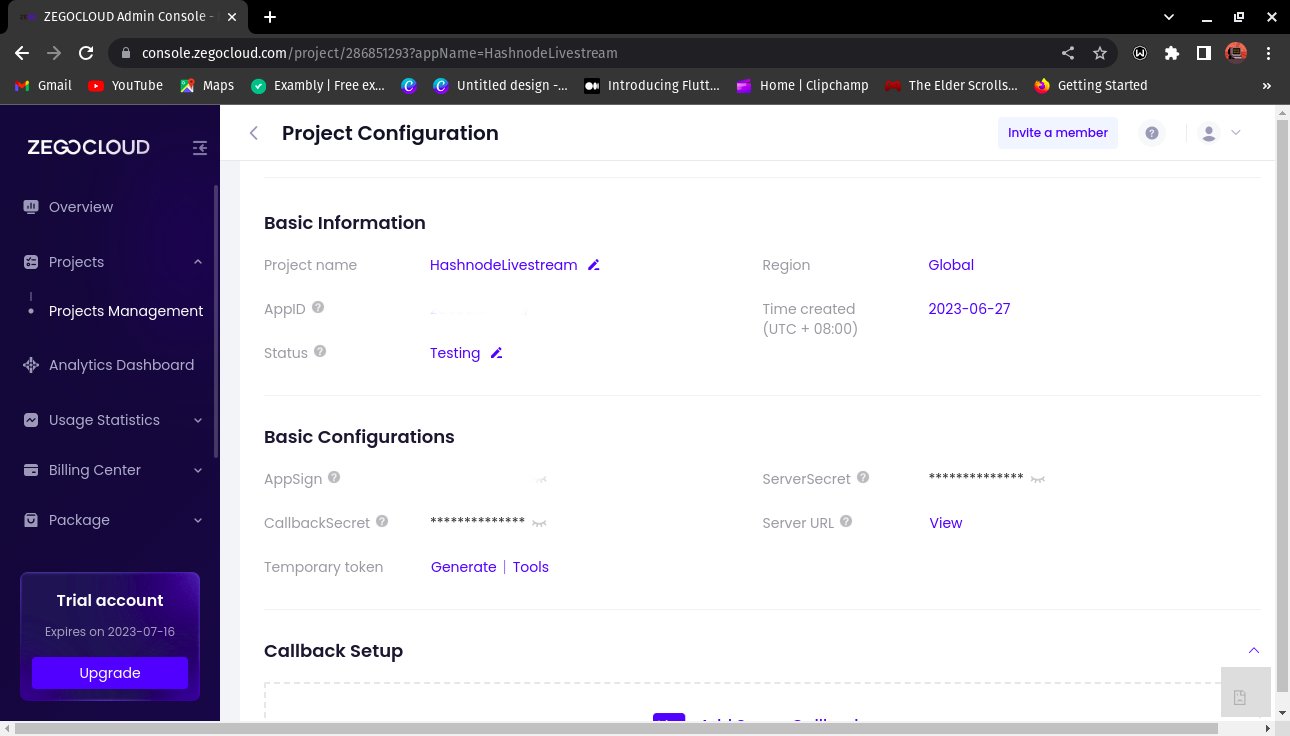
Step 3: Get your appSign and appID.
To use the live streaming ui kit, you need the appSign and appID. Click on the project you just created to get your appSign and appID.
Step 4: By now, I'm sure we all have created our Flutter project but if you have not, open up your terminal and type in
flutter create "project-name"
To create your Flutter project. After doing this, open your favorite IDE or code editor. I'll be using VS code for this project.
This is a basic boilerplate or code in Flutter
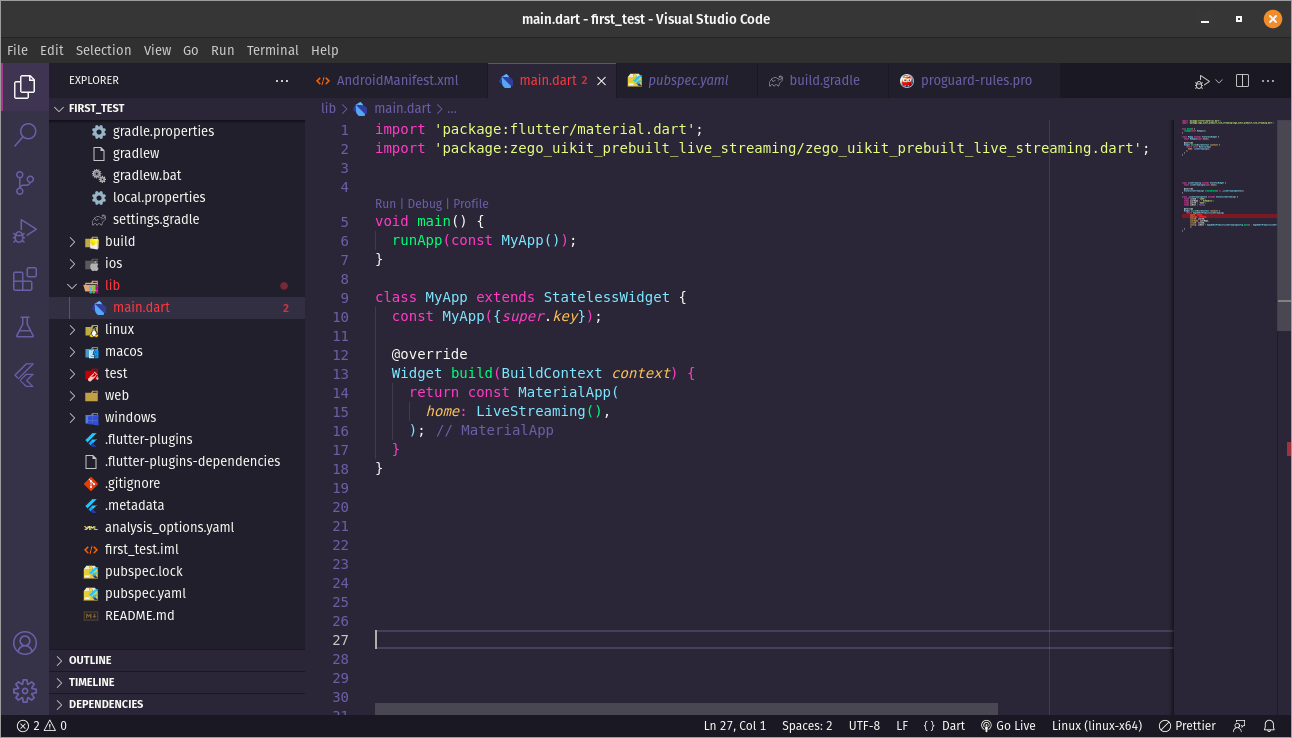
First, you import the Flutter material package and the live-streaming package. The void main function is the first function that runs in Dart and here we have a stateless widget using the Material style design.
Go into your_project/app/src/main/AndroidManifest.xml and add the following permissions as they will be used in our streaming app
<uses-permission android:name="android.permission.ACCESS_WIFI_STATE" />
<uses-permission android:name="android.permission.RECORD_AUDIO" />
<uses-permission android:name="android.permission.INTERNET" />
<uses-permission android:name="android.permission.ACCESS_NETWORK_STATE" />
<uses-permission android:name="android.permission.CAMERA" />
<uses-permission android:name="android.permission.BLUETOOTH" />
<uses-permission android:name="android.permission.MODIFY_AUDIO_SETTINGS" />
<uses-permission android:name="android.permission.WRITE_EXTERNAL_STORAGE" />
<uses-permission android:name="android.permission.READ_PHONE_STATE" />
<uses-permission android:name="android.permission.WAKE_LOCK" />
Go to your_project/android/app/build.gradle and edit the compileSdkVersion to 33. Also change the minSdkVersion to 19.
All this processes might be getting boring but we're almost done with our streaming app.
To prevent obfuscation of the SDK public class names, In your project's your_project > android > app folder, create a proguard-rules.pro file and add the following content
-keep class **.zego.** { *; }
Add the following config code to the release part of the your_project/android/app/build.gradle file.
proguardFiles getDefaultProguardFile('proguard-android.txt'), 'proguard-rules.pro'
Step 5: All we need to do is add the UI KIT.
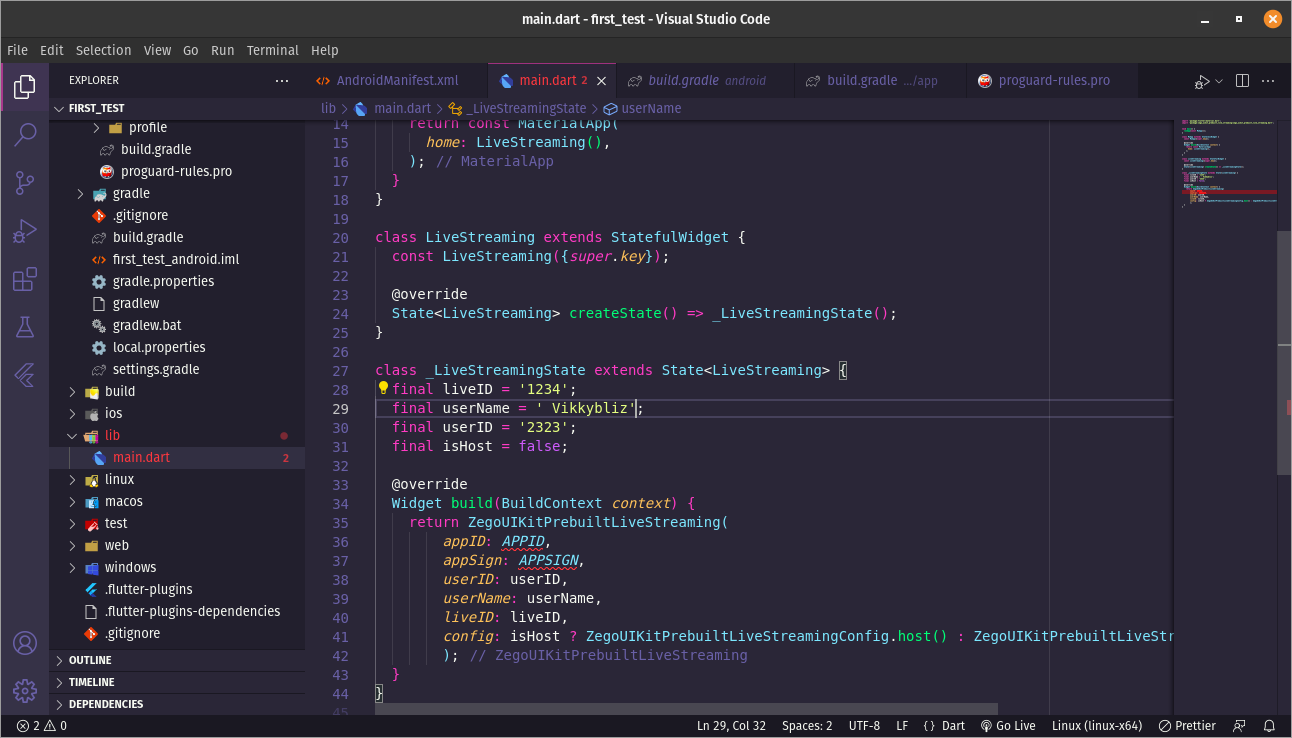
This is all the code needed to create the streaming app. Let me explain.
The appID and appSIGN are gotten from the ZEGOCLOUD dashboard.
The username is the name of the Host or the audience.
The liveID is the ID of the ongoing stream or meeting.
The user ID is the ID of the person joining the meeting(this can be random). And in the config, we can see two different configurations. If the person is the host, the UI should be for the host(host config), and if the person is the audience, the UI should be for the audience.
Step 6: And that's all. Run the app and start your live streaming. To know more about ZEGOCLOUD, check out the links below
· Get ZEGOCLOUD SDK for 10,000 free mins: https://www.zegocloud.com/
· Pre-built Live streaming Kit with Flutter: https://www.zegocloud.com/uikits
· Learn about ZEGOCLOUD live streaming SDK: https://www.zegocloud.com/product/live-streaming
· How to build flutter Live Streaming App: https://www.zegocloud.com/blog/flutter-streaming
Thanks for reading. Now you can build a live streaming app.


